Thursday, December 27, 2012

DIY: Modge Podge Fabric Plate

So my sister in law modge podges everything…so I decided to give it a try.
The result a very cute, custom fabric glass plate.


What you need:
ü  Modge podge
ü  Sponge brush
ü  Clear glass plate
ü  Scrap fabric
ü  Scissors
ü  Exacto knife or straight edge razor
ü  Newspaper to cover workspace

1.       I first cut my scrap pieces of fabric into squares (they were all
different sizes)
2.       Then I cut 4 strips for the edges of the plate

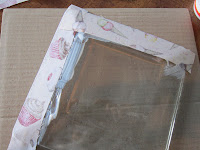
3.       Now you are ready to start modge podging – apply a generous amount of the glue to the plate, I would suggest starting on one side
   4.       Then place a fabric strip on the glue printed side down (so the   printed side will show when the plate is right side up) add more glue to the top and rub in the glue with your finger, this is the messy part.
   5.       Keep applying all the fabric until the entire plate is covered and be sure all the pieces are rubbed down, edges too.

   6.       Then apply a thick coat to the entire plate over all the fabric.
   7.       Let dry – about 2 hours
   8.       Once dry, check the edges and trim some with an exacto knife or straight edge razor, then reapply some glue to the edges to insure that they fabric isn’t going to peel up.

   9.       Let dry again
   10.   Now you are ready to serve your dessert on your new plate.  
      Please note: that this plate is no longer dishwasher safe, you will have to hand wash, or just wipe off with a damp, soapy cloth.


Check out what else you can do...
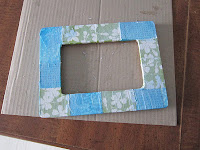
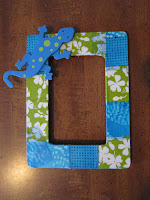
I also did a small wooden frame for a friend at work, using the same method!


Thursday, December 20, 2012

Merry Christmas


The store is officially closed for the holidays as we finished up the last order tonight.  We will open back up early January.  Thanks for thinking of us this holiday season.  We have been truly blessed by our customers.   I hope you all enjoy a blessed Christmas with lots of love and laughter..."Take your candle and go light your world!"

Last Minute DIY Gift Idea


Easy Christmas Ornaments


What you need
-  Clear Glass ornament
-  Scrapbook paper
-  Glue stick or tape
-  Ribbon

1.       Cut the scrapbook paper into 1/2” strips.  I used 12 x 12 papers but you can use whatever you have on hand.  I chose three or four different coordinating papers for mine.
2.       Once you have all the strips it’s time to start rolling them tightly printed side out.  Once you get to the end of the strip put a small amount of glue or tape to help hold it rolled up.
3.       Then place it in the ornament and keep on rolling until the ornament is full.
4.       Then make a bow with the ribbon for garnish and leave some extra to tie a knot to hang.
5.       You can date the ornament if you wish.
So far I have made three for myself, by this time next year maybe I will have a collection of them to hang on the entire tree! They are super cute!

PS- I have to thank my mother in law for the glass ornaments that she supplied me with…I had these huge 4” balls and I still wouldn’t be done rolling the paper to fill that one! She had some much smaller balls and even odd cube shaped ones, which turned out to be my favorite :)

Thursday, December 13, 2012

DIY Pendent Christmas Banner


So I saw these randomly somewhere...I can't even remember where now, but thought oh I'll make one for Keri for Christmas...well we got a little busy and got the flu and now I'm under the gun to complete this DIY craft project that was suppose to be simple.  This never happens in your house, right?!  Anyway, here goes a not so simple craft project


Supplies:
Scrap fabric
Scrap wood or barn wood would be best (12 inches by whatever length you would like it)
Pinking shears
Acrylic or Craft Paint
Spray glue
String
Hammer
Sandpaper
Stain
Paintbrush
Small Paintbrush
Black Permanent Marker
Clear Spray Paint
Paint letter stamps
Newspaper
2 small old nails

1.  If you have barn wood, attach it together in about a 12 inch wide or long and whatever length or width you need to spell your word.  Then skip down to step 6.  If you don't have barn wood, move on to step 2.

2.  Find some scrap wood hanging out in your garage.  Beat and scratch it with the hammer making it look old and worn.  Good stress reliever!  I also used sandpaper to smooth some edges while leaving other edges sharp.  The harder you are on it, the better.  I used both ends of the hammer.


3.  Then take a permanent marker and divide it into sections so it looks like barn wood.   I just free handed this part of it, so it didn't look planned out and rigid.  I even drew some notches in the wood along with some zigzag lines giving it an old look.  I used black because I was using a dark stain.  If you use a gray stain.  I would use a gray or silver marker.


4. Stain your board.  I used a dark stain because I had that left over from another project.  Gray would also look great.  Let the stain dry.


5.  Spray paint it with a clear coat of spray paint.   Let completely dry.

6.  Take your scrapes of fabric and cut with pinking shears an elongated triangle.  Do as many as you need to spell whatever you want the banner to say.  Love, Peace, Joy  Of course, you could do words unrelated to the holiday as well and leave up year round.  Family, Laughter, Happy Birthday, etc

7.  Take stamps and add paint with a paintbrush.  Stamp one letter on each triangle spelling out your word.  Sometimes paint goes through on back of fabric, so put some newspaper down.


8.  Once wood has completely dried,  lightly spray the back of your fabric triangles, once the painted letter has dried.  Place them along the string spacing them appropriately so it looks like a pendent banner hanging from the two nails.  String will be behind triangle.  Make sure you spray all those edges so they stay down.


9.  Then hammer nails in back of board and tie the ends of the string.  This will be how you will hang your pendent banner.


These look super cute on a mantel or tv stand and add a little modern country to your home decor.  I don't think I went out and bought anything either for this project.  Super chic and super cheap, got to love that!


Monday, December 10, 2012


I couldn't resist posting this sweet picture sent in by this doll's momma!  She is wearing one of our Christmas Apron Dresses and is just adorable as her parents poise as the two bookends.  Enjoy these last few weeks of the Holiday Season.  Make every second count!

Sunday, December 9, 2012

Check us out...we are trying our own website...

Go to playinghouse.bigcartel.com to buy some of our ready to ship Holiday sale specials!  We are thinking of moving forward with this website.  We would welcome comments.

Thursday, December 6, 2012

DIY: Cinnamon Cookie Decorations


Here is what you need:
¾ Cup Applesauce
½ Cup Cinnamon

   1. Mix ingredients until it forms a ball like dough, you may need to add more cinnamon to the   mixture.


   2. Roll out dough using a rolling pin and using cinnamon on counter to prevent dough from sticking.


   3. Once the dough is rolled out use cookie cutters to create your decorations, we used small cutters.  You will need a spatula to remove the cookies from the surface, and place them on a cookie sheet. Once they are on a cookie sheet use a coffee stirrer or straw to poke a hole for a ribbon to hang. 


   4. Preheat oven to 200 degrees and place cookie decorations in oven for approximately 2 hours.

   5. Let the decorations completely cool, and then cut your ribbon the length that you want.
I made my decorations into a cookie garland to hang above my kitchen window, and they smell great!


Wednesday, December 5, 2012

Holiday deadline extended to December 12.

In order for orders to be shipped and received by Christmas, please place orders by December 12th.  We had originally said the 5th, but for the most part are catching up.  Locals, after December 12th, we will look at each order individually to see if we can fulfill it.  Always ask, but we might have to say no or make adjustments to the order the closer to Christmas the order is placed.  We will also be closing for the holidays from Christmas through January 7th.  You can contact us, but we may be busy giving our hands and sewing machines a break!  So if you need anything early in January,you might discuss with us prior to Christmas if possible.  We are feeling very blessed by all the support and want to thank each of you for your orders and comments on facebook and our blog.  Enjoy these three weeks as we celebrate the holidays!

Thursday, November 29, 2012

DIY: Yarn Wreath


Materials needed:
Styrofoam wreath
Yarn
Felt
Ribbon
Scissors
Hot glue gun

1.       Start by wrapping yarn around wreath until completely covered and tie off with a knot.

2.       Cut flowers out of felt.  I did several different ones, I did the rosette (which was used in a previous tutorial), I also made a large petal daisy like flower, and a firecracker type flower.
3.       To make the firecracker flower cut felt lengthwise about 2” wide. Fold in half lengthwise and snip all the way down the strip about ¼” apart. Then starting from one end, and leaving it folded in half start rolling the flower, when to the end of rolling glue a small felt circle to bottom to help hold in place, now it is ready to attach to wreath.
Firecracker Flower (Red)


Large Petal Flower (Blue)

                                                                Large Petal Daisy                                              Rosette

4.       Arrange flowers on wreath however you would like and hot glue in place, you can also use straight pins if you would like.


5.       When finished you can add a ribbon like I did and use that as your hanger, or you can make a yarn loop on the top back of the wreath and hang from the loop.
6.       Now hang on your door for all to see! 


Wednesday, November 28, 2012

Franklin Lighting Celebration Details

We will be participating in the winter market from 2 to 8 pm in the old antique mall downtown.  Come see us.  We will have some cash and carry items for Christmas.  It is a great time with the lighting, parade, movie, and gingerbread house contest.  Attached is a schedule of events for the day!

Saturday, November 24, 2012

Drying on the clothesline...The Reversible Tunic

The Reversible Tunic is the latest addition to Playing House.  It is avalible in size 12 months to 8T.   The tunic has cap sleeves and clasps at the shoulders with buttons on both sides.  Each side has pockets as well.  This is a great choice if moms might have a different taste then their dolls.  Momma can pick one side and the doll the other.  Then both are happy.  This tunic is availble in any of our fabric options.  Shipping is $5.00, but can be combined with other purchases. 

Base Price $45
5T and up $10

Wednesday, November 21, 2012

Happy Thanksgiving


We want to wish you all a Happy Thanksgiving!  We hope you are living your life to its fullest...it will bring you so much to be thankful for in life and remind you what really is important and what's not.

Saturday, November 17, 2012

Doll Fabric...

Look at this darling fabric I scored!!! I tried to get the whole bolt, but they wouldn't let me. :)   I grabbed it for my dolls, but I'm sure I can get more if anyone wants to place an order for it.  


Russian Dolls