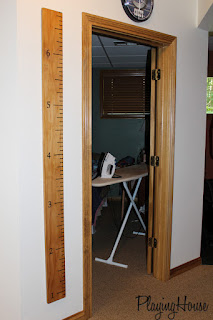
With that change, so much has been getting done around the house the past day or so. One of things we marked off our to-do list was something to record the children's heights as they got taller. And man are they growing up on us. It seems in a blink of an eye, doll #1 is a boy and no longer the little toddler he once was. Doll #3 is talking up a storm and wanting to do EVERYTHING the older dolls want to do when in my reality she should still be in her infant swing! Oh well, so here you go...a tutorial on the Measuring Stick.
It is really very easy and I wasn't planning on writing this so there are not many pictures...I will do better on my next tutorial.
 |
| our door to the workshop |
Supplies:
A board (1 in. X 6 in. X 6 ft.-this can vary...just depends on what you want and where you will put it)
Stain or paint
Paintbrush
Stencils
Sharpie
Square
Electric Hand Sander
Sandpaper
Measuring Tape
2 flush hangers
1. Make sure you have all your supplies...you laugh, but how many times do we think we have everything and then end up making 5 trips to the local hardware store.
2. Sand your board. I wanted rounded edges on my board. Take hand sander and soften the edges of the board. I like the look a little better and it's a little safer if a kiddo falls on it. (Doll #2 is clumsy.) Make sure you wipe your board down after you have finished sanding it.
3. Stain or paint your board. We stained ours to match our trim, but you could paint if you wanted to match a specific room. It took 2 coats. Stain or paint the sides as well. They will show once the board is hung.
4. Use your square to mark each inch on the board. You will want to decide where you want to hang your board and how high it will hang on the wall before you start marking. This will decide were you start. So if you hang it 8 inches from the floor, you want to start on the board with the 8 inch. We also made the mark for each foot about half the board long and each half foot about a quarter of the board long. Inch marks weren't as long. See finished picture for details on the mark. Each mark was about an 1/8 of an inch in width. Use a pencil first. Once completed, go back with a Sharpie and fill in the marks.
5. Add the numbers with your stencils. Again, use pencil, then go back over with a Sharpie.
6. Hang the Measuring Stick. My husband thinks it is best to screw it in the wall. I, on the other hand, didn't want to see the screws. He found something at our local hardware store to hang it on called flush hangers. We used them on the top and bottom.
And now you are ready to enjoy measuring your dolls each year. Ours were really excited to get measured and I am super excited that I will have a reminder just how little they once were!
I have been asked if we are selling these. If you are interested in one, please email justplayinghouse@gmail.com or personal message us on facebook!


No comments:
Post a Comment